|
The Markup tab exposes the user to the tools needed to "markup" the map with customizable map objects.
When the user clicks on the Markup tab the following toolbar will appear. Use the Markup Circle button to add a graphical circle to the map.
The left six buttons are "sticky" buttons. When clicked they appear to be pushed in. Only one of these six buttons can be selected at a time. They dictate which markup feature options to display directly below the markup toolbar.
Note: Although the markup circle option provides the user a way to add circle features to the map, these features cannot be saved and re-used later. Once the user closes the mapping application all of the markup circle features will be deleted.
After the user selects the markup circle button the following input boxes will appear:
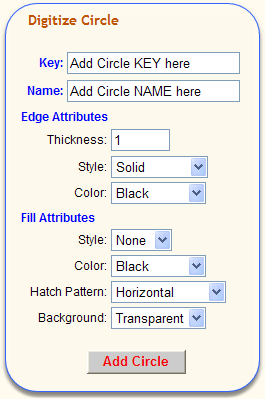
Key:
|
Any value that uniquely identifies this circle feature.
See Important Note at the bottom of the Erase Selected topic.
|
Name:
|
The tooltip, or maptip, information displayed in yellow when the user pauses the mouse pointer over the markup circle feature.
|
|
|
|
Edge Attributes
|
Thickness:
|
The edge size of the circle feature in pixels to be displayed in the map window.
|
Style:
|
Specifies the edge style to use for drawing the circle feature. Select a style from the drop-down list.
|
Color:
|
Specifies the edge color to use for drawing the circle feature. Select a color from the drop-down list.
|
|
|
|
Fill Attributes
|
Style:
|
Specifies the fill style of the circle feature. Select a style from the drop-down list; None, Solid, Hatch.
|
Color:
|
Specifies the color to use for the style/pattern of the circle feature if one is selected. Select a color from the drop-down list.
|
Hatch Pattern:
|
Specifies a pattern of lines that are equidistant from each other in the form of a matrix. Select a pattern from the drop-down list.
|
Background:
|
Select a background type from the drop-down list; Transparent, Opaque.
|
|
|
Add Circle:
|
After clicking the "Add Circle" button, the cursor in the mapping window becomes a digitizer.
Left-click on the map at the desired center point, drag the mouse to desired radius size, then release the mouse button to create a user defined circle.
|
Cancel:
|
Right-click anywhere in the map window to cancel the add circle action.
|
|